Author Archives: richard

Python PIP, Can’t connect to HTTPS URL because the SSL module is not available.

If you’re experiencing this error when ‘pip install’-ing or starting up a Docker container, then this post may be of use.

pip install -r requirements-dev.txt
WARNING: Retrying (Retry(total=4, connect=None, read=None, redirect=None, status=None)) after connection broken by 'SSLError("Can't connect to HTTPS URL because the SSL module is not available.")': /simple/jb-bayes/
docker-compose -f docker-compose.yml up -d mysql redis
Traceback (most recent call last):
  File "/home/work/.pyenv/versions/bayes-service/bin/docker-compose", line 5, in <module>
  ...
  ...
    from .. import tls
  File "/home/work/.pyenv/versions/3.9.2/envs/bayes-service/lib/python3.9/site-packages/docker/tls.py", line 2, in <module>
    import ssl
  File "/home/work/.pyenv/versions/3.9.2/lib/python3.9/ssl.py", line 98, in <module>
    import _ssl             # if we can't import it, let the error propagate
ImportError: libssl.so.1.1: cannot open shared object file: No such file or directory

This is likely due to libssl being installed, then your python virtualenv env created, then something happening to libssl, such as being upgraded/removed.

The first step to resolve is to ensure you have libssl installed.

Download it from here

Then install:

wget http://security.ubuntu.com/ubuntu/pool/main/o/openssl1.0/libssl1.0-dev_1.0.2n-1ubuntu5.9_amd64.deb

wget http://security.ubuntu.com/ubuntu/pool/main/o/openssl1.0/libssl1.0.0_1.0.2n-1ubuntu5.7_amd64.deb

sudo apt install ./libssl1.0.0_1.0.2n-1ubuntu5.9_amd64.deb 
sudo apt install ./libssl1.0-dev_1.0.2n-1ubuntu5.9_amd64.deb

Once this is done you’ll need to reinstall the Python version you were using when the error originally occurred. In my case I’m using pyenv so had to take the below steps:

pyenv uninstall 3.9.2
pyenv install 3.9.2
pip install -r requirements-dev.txt
# Now installs without issue

If you’re not using pyenv, then however you installed Python remove it and reinstall.
How to connect to Cisco Meraki VPN on Ubuntu/Pop OS

I spent a long time getting this working myself so thought it best to save the steps somewhere. Be sure to follow every step exactly.

1) Run the following terminal commands.

sudo add-apt-repository ppa:nm-l2tp/network-manager-l2tp
sudo apt-get update 
sudo apt-get install network-manager-l2tp
sudo apt-get install network-manager-l2tp-gnome

2) Now Reboot your computer.

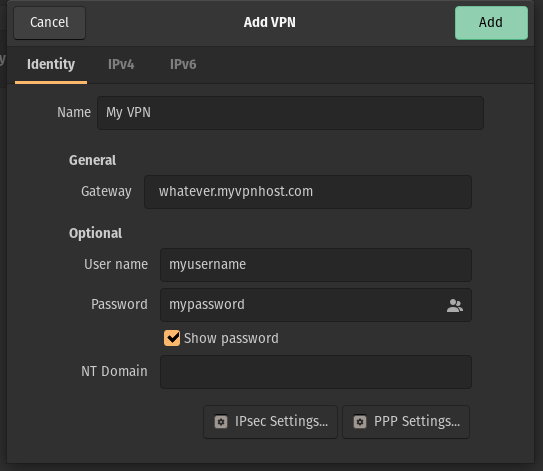
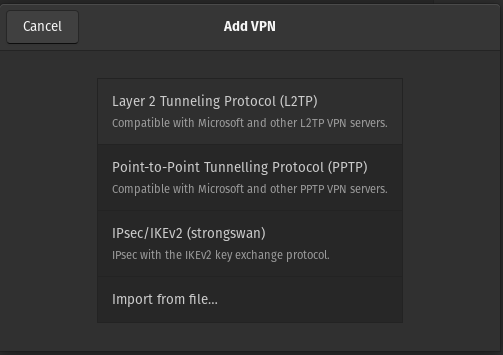
3) Open Network settings, click “+” to add a VPN connection of type “Layer 2 Tunneling Protocol (L2TP)”.

4) Enter a name for it.

5) Enter the hostname into the “Gateway” field.

6) Enter your username and password (click the <?> icon next to it first and select an option)

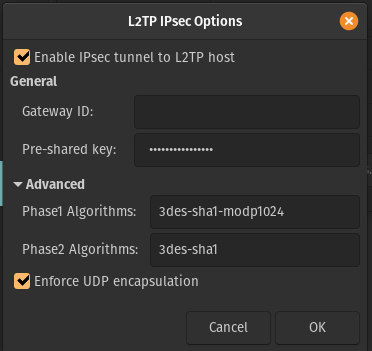
7) Click “IPSec Settings” and enter them as in the screenshot below.

8) Save/close the settings window(s).

9) Enter the following terminal commands:

sudo service xl2tpd stop
sudo systemctl disable xl2tpd

10) Re-open the Network settings and attempt to connect to your newly created VPN, it should now work. If it doesn’t check out tail -f /var/log/*.log for information on what could be wrong.

Compounding time-saving command-line tricks for Software Developers

First, find out what your most commonly used commands are, by running the below command.

history |  awk '{print $1}' | sort | uniq -c  | sort -nr | head -n 15

For me, it was the following.

    431 git
    122 ptw
    109 yarn
    100 sudo
     65 cd
     51 docker
     36 find
     34 rm
     31 pip
     31 ls
     23 cat
     20 pyenv
     20 kill
     16 gpg

To save time, over time. We can either try to remove commands or shorten the amount we need to type to execute them.

In my case, I added shell aliases for the following commands to shorten them.

g -> git
d -> docker
y -> yarn
f -> find

Sudo has to stay, but we can remove the need to have to keep typing in a password by taking the following steps.

  1. Type ‘sudo visudo
  2. In the file which opens in your editor, add the following line to the bottom, replacing ‘<your_username>’ with your system login username.

<your_username> ALL=(ALL) NOPASSWD: ALL

After this, you can type ‘sudo whatever command’ in a terminal without being prompted for the password.


That’s it. Although these changes seem minor, over time, you can save yourself a significant amount of time using these methods.

Do you have any tips to speed up your workflow and save time? If so, share them below!

One Python Development Setup to Rule Them All

Well, not quite. But here’s what I’ve settled on after working with Python constantly since 2012.

Virtualenv and Python version management

pyenv. I consider this the best as I can install and switch between any Python version (including conda) I like with ease. If you need this functionality and you’re not using pyenv, you’re missing out.

Installing Packages & managing their versions

I use pip. New tools have waded-in in recent years, but pip works for me and is still the most widely used tool.

Along with pip, I use requirements.txt (with fixed versions if it’s an application repo, supported version ranges if it’s a package/shared library project). I use requirements-dev.txt to hold development/test packages.

Releasing Packages

I use zest.releaser. This takes the pain out of releasing packages, automating the version number bumping, HISTORY updates, tagging etc.

IDE Setup

I use VSCode, because it’s fast and easy to use from day one.
I use an array of extensions. One, in particular, makes this choice a no brainer.

  • Settings Sync” this keeps your editor config in the ‘cloud’ meaning you can log in to any computer and sync that VSCode installation and you’re good to go in seconds.

I use the built-in terminal emulator within VSCode, along with Fish shell. I use Fish for its intelligent tab completion.

Testing

I use pytest for all Python unit and integration tests. It’s the industry standard right now and much better than the alternatives (nose, unittest).

To save a huge amount of time while doing TDD I use this tool avoid switching around my development environment.


That’s it, it’s quite boring but has stood the test of time. I hope this is useful to someone, if you have any suggested improvements please comment below, or Tweet me!

Supercharge your Python testing workflow

When writing unit tests in Python you may find yourself switching back and forth between your code editor window and terminal to re-run your tests.

You can avoid this by using inotify. In short, it can re-run your tests when you change any Python files in your project. Here are some little scripts to help you do that.

First, install:

sudo apt install -y inotify-tools

If you’re using bash, add this to your ~/.bashrc and restart your terminal:

function ptw() {
    pytest $1
    while find -name "*.py" | inotifywait -e close_write --fromfile - ;
        do pytest $1
    done
}

If you’re using Fish, add to ~/.config/fish/config.fish and restart your terminal:

function ptw
    pytest $argv
    while find -name "*.py" | inotifywait -e close_write --fromfile - ;
        pytest $argv
    end
end

Now instead of running your tests like:

pytest test_stuff.py

Just do:

ptw test_stuff.py

When the tests finish you’ll see the process does not exit, and when you edit a .py file in your project the tests will automatically re-run.

This saves a tonne of time, enjoy.


Fix: apt-get update hanging within Ubuntu Docker container

I experienced this issue in a Docker container, hanging at this point:

Step 5/24 : RUN apt-get update && apt-get install -y --no-install-recommends         cuda-cudart-$CUDA_PKG_VERSION         cuda-compat-10-1 &&     ln -s cuda-10.1 /usr/local/cuda &&     rm -rf /var/lib/apt/lists/*
 ---> Running in 3cb10279744e
Ign:1 http://deb.debian.org/debian stretch InRelease
Get:2 http://security.debian.org/debian-security stretch/updates InRelease [94.3 kB]
Get:3 http://deb.debian.org/debian stretch-updates InRelease [91.0 kB]
Get:4 http://deb.debian.org/debian stretch Release [118 kB]
Get:5 http://deb.debian.org/debian stretch Release.gpg [2434 B]
Get:6 http://deb.debian.org/debian stretch-updates/main amd64 Packages [11.1 kB]
Get:7 http://security.debian.org/debian-security stretch/updates/main amd64 Packages [485 kB]
Get:8 http://deb.debian.org/debian stretch/main amd64 Packages [7084 kB]

Strace showed it waiting on data from a socket:

$ ps -faux|less|grep docker-compose
testuser  8098  0.4  0.4 115644 39016 pts/0    S+   08:56   0:00  |                   \_ /usr/bin/python3 /usr/local/bin/docker-compose build app
testuser  8402  0.0  0.0  13136  1084 pts/1    S+   08:59   0:00              \_ grep docker-compose
$ sudo strace -fp 8098
strace: Process 8098 attached
recvfrom(6, 

I narrowed down the issue to a https apt sources.list entry I had added and the fix was to install the following packages before that sources update:

apt-get install -y --no-install-recommends gnupg2 curl ca-certificates apt-transport-https

How to use ipdb with docker-compose

Sometimes there may be in issue you need to debug which only occurs within a Docker container. However by default ipdb.set_trace() won’t work. Here’s how to get it working.

Enable interactive mode by adding stdin_open and tty the following to your docker-compose.yml. For example:

version: "3"
services:
  app_tests:
    build: .
    stdin_open: true
    tty: true
    command: ./run_my_tests.sh

Now when you run your tests (docker-compose run app_tests) the terminal will stop at your break point.

Attach your local to the container. In another terminal window run docker attach <container_id> which will bring up the ipdb interactive session in your terminal.

How to use localstack with Gitlab CI

If you’re using a standard style .gitlab-ci.yml format such as the below, it won’t work.

image: ubuntu

services:
  - localstack/localstack:latest

variables:
  SERVICES: s3
  DEFAULT_REGION: eu-west-1
  AWS_ACCESS_KEY_ID: localkey
  AWS_SECRET_ACCESS_KEY: localsecret
  HOSTNAME_EXTERNAL: localstack
  HOSTNAME: localstack
  S3_PORT_EXTERNAL: 4572
  LOCALSTACK_HOSTNAME: localstack

test:python36:
  script:
    - pip install awscli
    - aws s3api list-buckets --endpoint-url=http://localstack:4572
Could not connect to the endpoint URL: "http://localstack:4572/"
ERROR: Job failed: exit code 1

However if you use build stages instead as below, it will work.

stages:
  - test

test-application:
  stage: test
  image: ubuntu
  variables:
    SERVICES: s3:4572
    HOSTNAME_EXTERNAL: localstack 
    DEFAULT_REGION: eu-west-1
    AWS_ACCESS_KEY_ID: localkey
    AWS_SECRET_ACCESS_KEY: localsecret
  services:
    - name: localstack/localstack
      alias: localstack
  script:
    - pip install awscli
    - aws s3api list-buckets --endpoint-url=http://localstack:4572
{
    "Buckets": [],
    "Owner": {
        "DisplayName": "webfile",
        "ID": "bcaf1ffd86f41161ca5fb16fd081034f"
    }
}
Job succeeded

Working in Nuremberg, Germany – a retrospective

Mid November 2018 I decided I had grown tired of working in London so decided to make a change. A job offer appeared in my Inbox for a position at a large company based in Nuremberg, Germany. With very little research I decided to go for it.

Work wise it was an interesting project with great people, here are my general observations from my time there.

The People

Germans are somewhat more reserved than people in the UK.

However in the work environment they will get right to the point, no politely dodging around a painful subject like in the UK. This seems rude at first but it’s definitely more efficient and refreshing after a while.

There is a large immigration population in Nuremberg, mostly from Turkey from what I’ve seen. Most seem to assimilate well, starting up small businesses around the City.

Weather

Turns out I moved to Germany around the time of the worst possible weather. Sideways freezing rain for weeks on end makes you appreciate the “warm” smog bubble of London a little more.

Businesses

Businesses such as supermarkets close much earlier in Nuremberg. There are no 24 hour stores anywhere and on Sundays everything is closed.

There are few if any grocery delivery services. This really makes you appreciate the Ocado/Tesco/etc services in throughout the UK.

Parking

Parking is limited in Nuremberg, as is the enforcement of illegal parking. On every inch of kerb in the populated areas you’ll likely find a car carelessly parked at an interesting angle.

On the plus side, where real parking spaces are found they are much wider than those in the UK. (Thank you German automotive industry).

Driving Style

In the city in Germany, just as in other cities such as London there’s the usual aggressive driving style you’d expect. However on the motorways/autobahn the style differs significantly to that of the UK.

  • People keep to the slower lanes when not overtaking (this never happens in the UK).
  • It’s not unusual to be driving at 155 mph and have another car breeze past you.
  • Motorways in Germany are of a higher quality, holding much less standing water in the rain.
  • Unlike the UK, when it’s raining people don’t forget how to drive. 95 mph in heavy rain seems normal in Germany.

Cash Obsession

In London I was accustomed to using debit card for all transportation and contact-less for most purchases.

In Nuremberg however there seems to be an obsession with holding cash in your hand. The only places that seemed to take card were large supermarkets. All bars would only accept cash, I couldn’t find a reason for this, it’s either cultural or for money laundering purposes.

Work/life balance

Nuremberg is a clear winner in this respect. Even though I was working at a large organization I saw the following working hours patterns.

Monday – Thursday: 8:30am – 4:30pm

Friday: 8:30am – 3pm

While in London… well I’ll just quote the CEO of a company I recently worked with:

Work starts sometime before 9am and ends sometime after 6pm.

Clearly madness, especially for Software Engineers.

Interestingly with the shorter hours in Germany I found my productivity sky-rocket. I was doing more work in a shorter time and felt refreshed every morning. If only companies in London would learn ;)


In conclusion – London suits myself much better and as I sit on this train returning to the Land of Smog, on arrival I’ll have a new appreciation for the infrastructure and attractions at my disposal 24/7.

Everything guide for the privacy conscious

In 2019 most people’s data is held across cloud providers, free to be sold or subpoenaed at any time.

Here are my personal choices to limit this, be it in vain or not it helps me sleep better at night.

Email

Use Proton Mail, emails are decrypted in the browser using your key (password). iOS & Android apps.

Downsides: Limited features, apps only allow single user login at once.

File syncing

Use Tresorit, end-to-end encrypted. Unlike similar services this one has a decent mobile app for iOS and Android devices so you can sync & backup your Photos automatically.

Calendar syncing

Use a self-hosted Next Cloud running with the Calendar app enabled. This will give you a CalDAV server which most Calendar applications can sync with.

Note taking

Use Standard Notes, end-to-end encrypted syncing with apps for Mac, Windows, Linux, iOS, Android.

VPN

If you don’t want to host your own VPN then use iPredator. Founded by Peter Sunde this is the only provider I would consider trusting.

If you’d like to host your own, use Algo.

Password management

Use LastPass, end-to-end encrypted with plugins for Firefox, Chrome & Android.

Instant messaging

Use Signal, end-to-end encrypted by default, unlike other services.


Do you have any better suggestions for the above? Comment below!